DROPS' Public REST API
DROPS' Public REST API relies on conventional CRUD methods for persistence of data. By default, authentication on the API is done using basic HTTP authentication. The API is available in XML ("Accept: application/xml ") or JSON ("Accept: application/json ") and can generate HTML when browsing with a browser.
Third-party systems that want to automate DROPS will interact primarily during DROPS' operation phases, namely the creation of releases and the deployment of releases.
All the entities and their metadata managed by the API can be consulted via the URL http://<server>:<port>/metadata and the GET method.

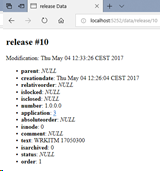
Each entity list can be consulted via the URL http://<server>:<port>/data/<entity>
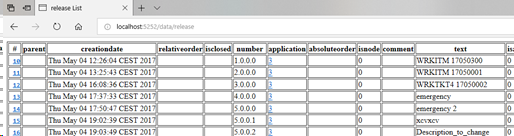
or the URL http://<server>:<port>/data/<entity>/<id> for a particular entity ID.
Access to a complete documentation that gives a description of all the CRUD operations available on DROPS' Public REST API. To do so, add /drops/api/doc to your DROPS Server URL. The schema of each entity is also dynamically documented and referenced when they are used.
If you created customized web services, you can also add specifications for them. To do so, add in the drops.restapi bundle and in the specs/custom folder, a dedicated JSON file that contains only the paths node for each one of them.
{
  "paths":
  {
    "/mycustompath": {
      "get": {
        ...
        "security": [ { "basicAuth": [] } ] //necessary if the endpoint needs authentication
    }
  }
}
Example of JSON file content for a customized web service
A Swagger web interface is also served by the DROPS Server, that needs authentication. To access the interface, add /swaggerui to your DROPS Server URL.
It is necessary to install Maven to use this feature, as the Swagger UI is fetched by a Maven dependency.
The classic CRUD methods apply to entities:
- GET: fetch the entity list or a particular entity instance
- GET http://server:5252/data/release - reading the list of entities releases
- GET http://server:5252/data/release/10 - read release entity with identifier 10
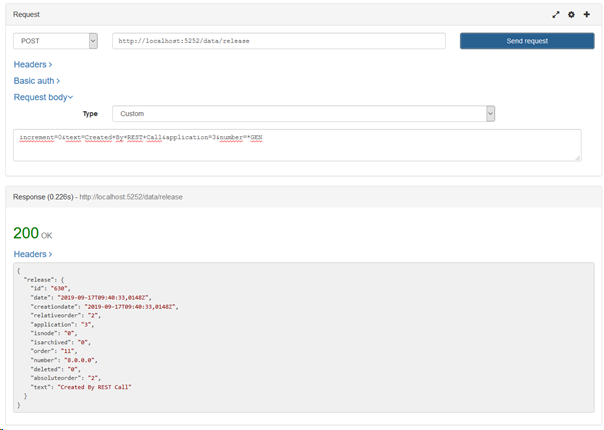
- POST: create a new entity. The creation parameters are in the body of the request
POST http://server:5252/data/release
body: increment=0&text=Automated+release&application=3&number=*GEN – creation of a new empty release in the application with ID 3, the description of the release will be "Automated release", the release number will be generated automatically by incrementing the major number of the current counter
NoteThe new generated ID is available in the answer.
- PUT: update an entity
PUT http://server:5252/data/release/10?text=New+description - update description of the release with ID 10
- DELETE: delete an entity
DELETE http://server:5252/data/release/10 - delete the release entity with ID 10
It is possible to filter the result lists with lists of criteria:
-
GET http://localhost:5252/data/release?criteria=<and><equals attribute="application" value="3"/><equals attribute="number" value="1.0.0.0"/></and>
get the list of releases whose number is 1.0.0.0 and for the linked application with ID 3

The creation of a release is done in several phases:
- Opening/Creating the release
- Creating the import instance and add import strategies
- Running the import instance
- Retrieving the result of the import instance
If the release already exists then the ID can be retrieved using a GET request, but if the release doesn't exist yet, it must be created. This is a POST request that includes the necessary parameters in the body of the release entity.
- increment: the part of the release number to increment when the release number is automatically generated
- text: description of the release
- release: the ID of the application this release relates to
- number: number of the release to be created or *GEN for automatic generation using the increment part
The HTTP response 200 confirms that the release was created successfully. The ID of the new release is available in the response body.
First of all, you have to create the import instance on the previously-created release using a POST request on the importExecution entity or by using the /import endpoint.
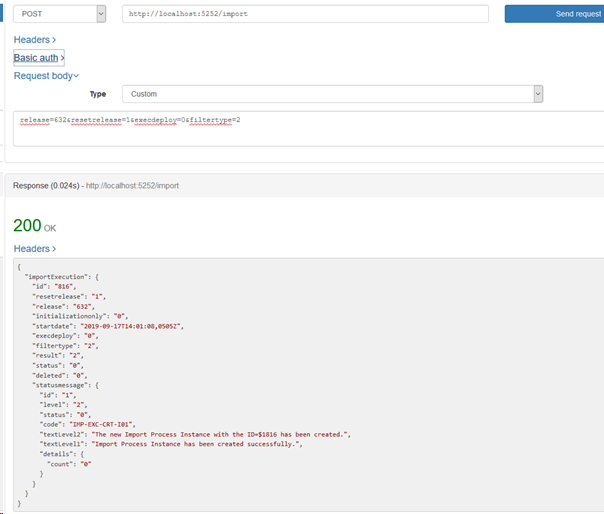
- release: ID of the release this import instance relates to
- resetrelease: 0 or 1 to empty the release content before executing the import
- execdeploy: automatically execute a deployment after executing the import. (extra parameters may be needed)
- filtertype: filter to apply to this import (extra parameters may be needed)
- 0: do not apply filter
- 1: file filter
- 2: custom filter
Most of the time filters are not needed or custom filters are used. To use custom filters, we must add the import strategies of the different components and the possible import parameters.
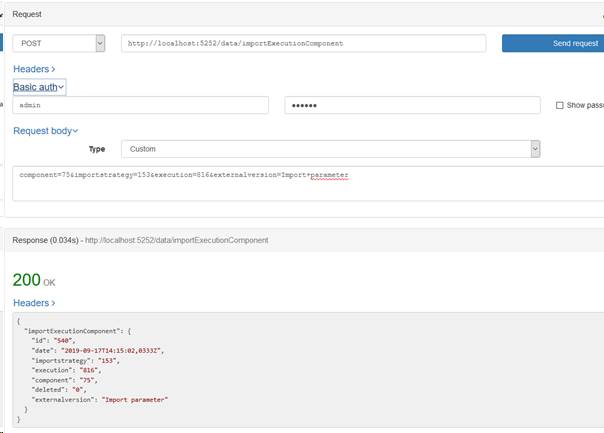
- component: ID of the component this filter relates to
- importstrategy: ID of the import strategy to use for this component
- execution: ID of the import instance
- externalversion: parameter for the import strategy
The HTTP response 200 confirms that the import instance was created successfully. The ID of the new import execution component is available in the response body.
At this stage the import instance is now configured and ready to run.
The import instance execution is launched using a POST request on the entity or by using the /import endpoint.
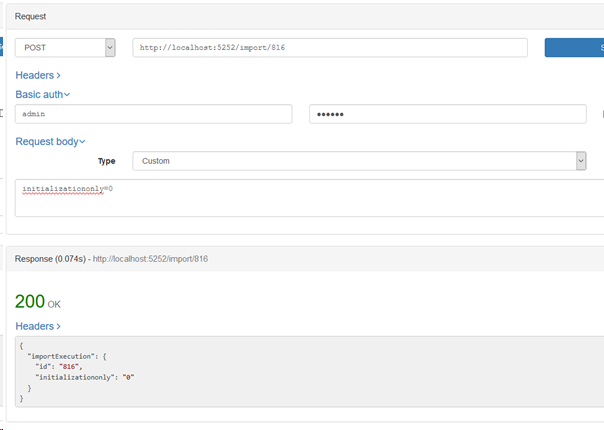
- initializationonly: optional parameter in the body to tell DROPS to launch only import strategies typed as initialization one.
The HTTP response 200 confirms that the import instance execution was launched successfully.
The execution status of the import instance is available for consultation via a GET request.
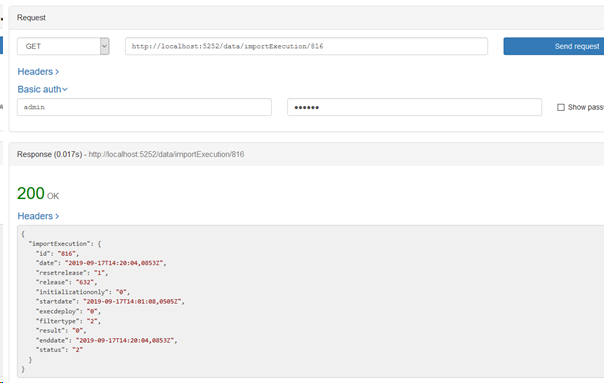
The HTTP response 200 returns the status and result of the import instance execution.
The different statuses are:
- 0: Prepared
- 1: In progress
- 2: Completed
The different types of results are:
- 0: Succeeded
- 1: Failed
- 2: Not available
The import execution status is prepared or running until the status is completed. When the status is completed an import execution result is set.
Deploying a release can be done in two ways:
- Transfer of deliverables and deployment at once
- Provisioning deliverables and launching the deployment instance asynchronously
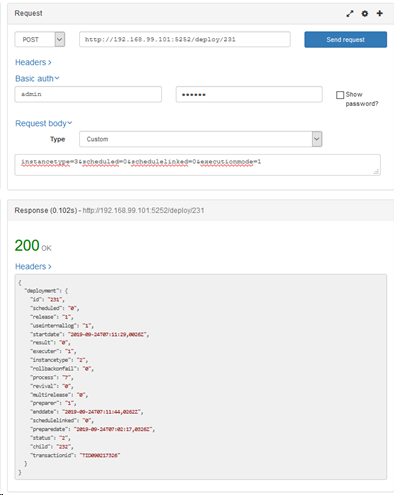
The deployment instance is created by a POST request to create the deployment instance.
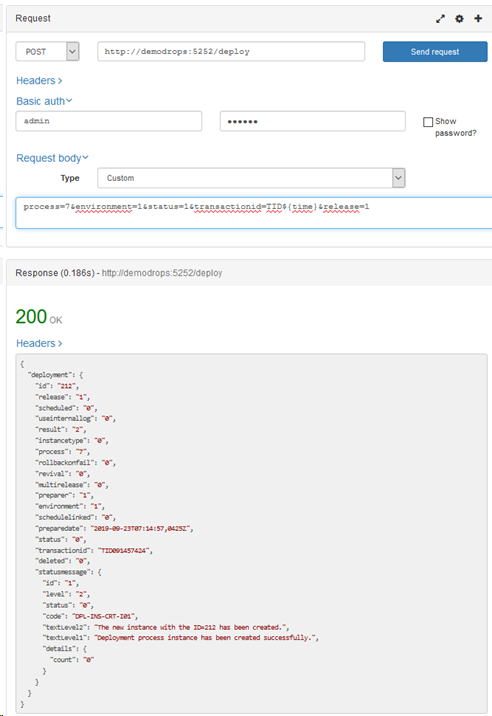
- process: ID of the process to apply
- environment: ID of the target environment
- transactionid: template to apply for generation
- release: ID of the release to deploy
The HTTP response 200 confirms that the deployment instance was created successfully. The ID of the new deployment instance is available in the response body.
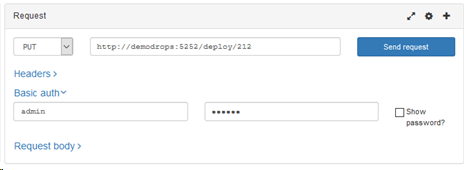
Once the instance is created and the instance ID read, the instance is launched via a POST or PUT request on the entity or by using the /deploy endpoint.
The result and monitoring of the deployment instance is done with a GET request on this same instance.
The deployment execution status is prepared or running until it is completed or canceled. When the status is completed a deployment execution result is set.
The different statuses are:
- 0: Prepared
- 1: In progress
- 2: Completed
- 3: Canceled
- 8: Suspended
The different types of results are:
- 0: Succeeded
- 1: Failed
- 5: Succeeded with warnings
- 6: Not available
This mode starts with creating a deployment instance just like in the previous deployment mode. This deployment instance must be "transformed" into a Transfer instance (transfer-only in DROPS). This operation is done using a PUT request on the new instance.
![]()
The parameters are set in the request body:
- instancetype:
- 2: transfer only
- 3: execute only
- scheduled: 0 or 1 if schedule is used
This query does not return content.
The instance can now be executed using POST or PUT. Only the provisioning (the transfer of deliverables) will be executed.
The execution of the transfer instance can be followed via a GET method, as usual, on the deployment instance. Statuses and results are available in the response body.
Now, you have to create the deployment instance that will execute the installation phase of the deployment. As a reminder, the previous deployment instance only corresponds to the provisioning phase, that is to say, the transfer of the artifacts.
This creation is done using a new POST request on the deployment instance where the value of the instance type field is 3 and the execution mode field is set to 1.
The response contains a child field, which is the ID of the new linked deployment instance that corresponds to the installation phase of the deployment.
The execution of this new instance can be followed, as usual, with a GET request.
The status and result fields have the same meaning as before.
Rollback is only possible on a deployment instance that has already been executed. To implement the rollback, you need the ID of the deployment instance to revert. In the case of a two-part deployment, transfer + installation, you also need the deployment instance ID corresponding to the ID of the child install instance.
To implement the rollback, you must create a deployment instance using the /rollback endpoint and the POST method.
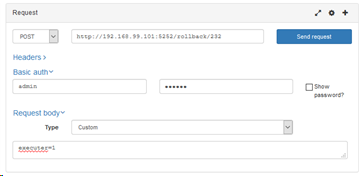
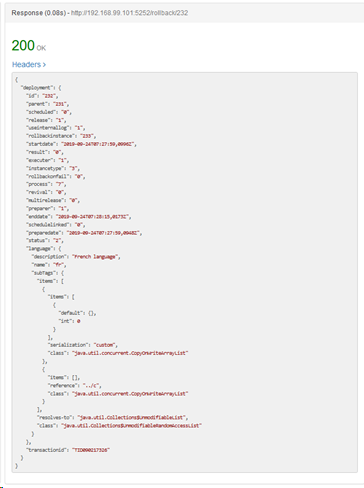
The response contains a rollbackinstance field whose value is the ID of the new deployment instance created for the rollback part of the deployment.
This ID is used to follow the progress of the rollback instance using a GET request on the deployment entity.

The status and result fields have the same meaning as before.
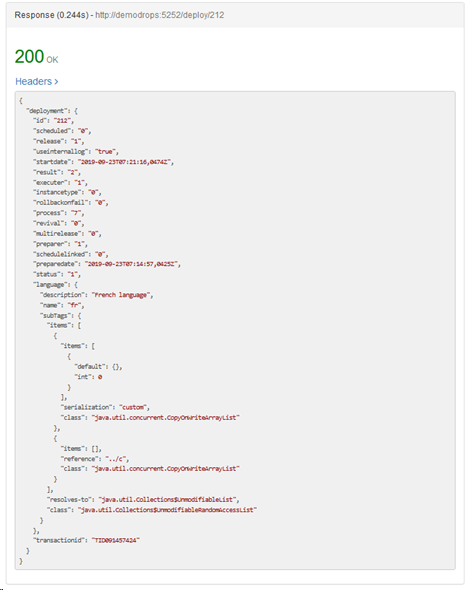
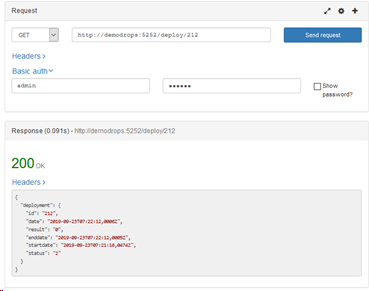
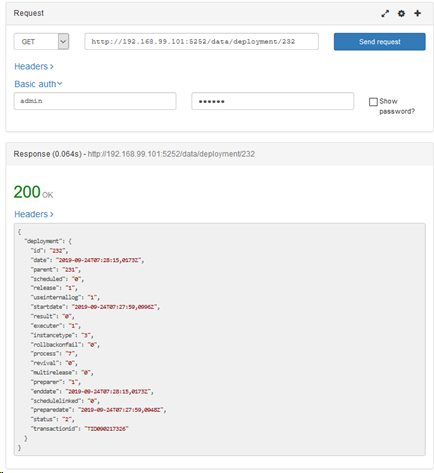
Monitoring the execution of a deployment instance is done using a GET request:
- either on the deployment instance entity in order to have the complete information about the instance,
![]()
- or on the endpoint /deploy to have only the follow-up of execution.
![]()
The same logic applies to the import process instances using the /import endpoint.


